Tag Archives: real food

Red Velvet Cake with No Food Coloring

Happy Valentine’s Day! I shared the other day on my mental health blog about loving one’s self. Here I’d like to share one way to love someone special. Bake a cake! And if you are concerned about not feeding your family artificial dyes and ingredients, here’s one way to have your cake and eat it, too. I have made red velvet cupcakes before using beets to color them. This Valentine’s I tried out a red velvet cake with no food coloring.

red velvet cake with no food coloring

Last week I was helping Little Bird with a science kit, and we were learning about acids, bases, and ph. We experimented with adding acidity (in the form of citric acid and vinegar) and baking soda (with is alkaline) to water colored with red cabbage powder. The acid made it more vibrantly red and the base made it more purple. No wonder red velvet has something acidic like lemon juice and/or vinegar in it! It also made me wonder if too much baking powder was the reason the red velvet potato bundt cake I tried to make came out purple/brown. (I love learning more of the science behind baking.)

red velvet cake with no dye

I consider this more a recipe review than a super polished recipe. But I wanted to share none the less. I have only made it one time, and would tweak it some more to make it a little lighter. I used the suggested cream cheese, but found it way too dense, for my preference. I would replace that with buttermilk, and use more eggs. I reduced the sugar by half, in both the cake and the frosting. Next time I might play around with non-refined sweeteners.

Red Velvet Cake with NO Food Coloring

5.0 from 1 reviews
Red Velvet Cake with No Food Coloring
Author: 
Recipe type: Dessert
Cuisine: American
 
This recipe makes a dense red velvet cake, colored by beets and without any food coloring or dye.
Ingredients
  • 2 large beets (enough for 1 cup puree)
  • ¼ cup freshly squeezed lemon juice
  • 1 tablespoon apple cider vinegar
  • 2 sticks (16 tablespoons) unsalted butter, room temperature
  • 1 8 ounce package of cream cheese or 1 cup of buttermilk
  • 1 cup sugar
  • 6 eggs, room temperature
  • 1½ teaspoons pure vanilla extract
  • 2 cups unbleached all-purpose flour
  • 1½ teaspoons baking powder
  • 1½ teaspoons kosher salt
  • 2 tablespoons natural raw cocoa powder
  • 2 recipes cream cheese frosting
Instructions
  1. This recipe is adapted slightly from a post from sophistimom. I did not change her method, so follow the link for the instructions. Here are my notes, however:
  2. Starting with raw beets seems more labor intensive, but my past results using packaged, pre-cooked and peeled beets did not work as well.
  3. My Vitamix did not process the beets well, as it wasn't full enough or liquid enough. My old Kitchen Aid food processor worked great, and I wish I would have started with it from the beginning.
  4. I found it too dense and heavy with the cream cheese. I suggest buttermilk, which I will use next time.
  5. I used 4 eggs as called for in the original recipe. Next time I will increase it to 6. My mom suggested separating the eggs, beating them separately to give it more leavening from the egg whites, and then folding them in.
  6. For the frosting, I made a double batch of my Cinnamon Cream Cheese Frosting, omitting the cinnamon and pumpkin.

Real Pumpkin Pie with Maple Whipped Cream

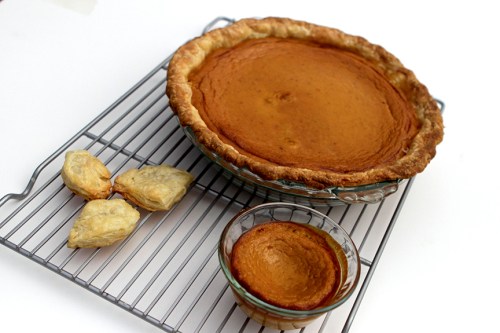
Ditch the cans this year! Try this real pumpkin pie made with a sugar pie pumpkin, honey, cream and milk, eggs, fresh ginger, spices and love! I use the word “real” to mean fresh, whole, and unprocessed foods, and without refined sugar. I made this last year for Thanksgiving. It was gone in a few minutes, leaving the store-bought pumpkin pie next to it largely intact. I’ve since made it three or four more times and my family is in love.

Real Pumpkin Pie with Maple Whipped Cream

So, can a pie by a healthy treat? Maybe this one! Pumpkin is low in calories, and high in fiber and disease-fighting vitamins. It is one of the best source of bioavailable carotenoids and is considered by some to be a super food.  I always knew I was onto something when I ate pie for breakfast! My dad used to do it, too.

To can or not to can?

I recently read an article detailing why canned pumpkin makes better pie. I was dubious, which was confirmed when I saw the “news” was sponsored by one of the largest manufacturers of canned pumpkin. Hmmmm…. And I bet anyone who has made pumpkin pie has tried either evaporated or condensed milk. But think about it… Cans are a great way to preserve food for when fresh isn’t available. Do you have access to fresh dairy? I’m guessing yes. I dare you to try this recipe and tell me fresh isn’t more flavorful. Roasting the pumpkin whole and peeling it when cool makes it super easy, as well. I use a blender to make the batter, leaving my mixer free for whipping cream!

Real Pumpkin Pie with Maple Whipped Cream

Real Pumpkin Pie Recipe

Adapted from allrecipes.com. Makes one 9″ pie.

  • 1 medium sugar pie pumpkin (2 cups of cooked pumpkin puree)
  • 1 teaspoon freshly grated ginger (or 1/2 teaspoon ground ginger)
  • 1 teaspoon ground cinnamon
  • 1/2 teaspoon freshly grated nutmeg
  • 1/2 teaspoon allspice
  • 1/2 teaspoon salt
  • 3 large eggs
  • 3/4 cup honey, slightly warmed up
  • 1/2 cup milk
  • 1/2 cup heavy whipping cream
  • 1 uncooked single pie crust, kept refrigerated in pan until ready to use

Preheat oven to 375° F. Place pumpkin directly on a center rack. Roast about one hour until the flesh is soft to the touch with an oven mitt. Turn off the oven and allow the pumpkin to cool completely.

Preheat the oven to 400° F. Peel the skin off the pumpkin and separate the flesh from the strings and seeds. Place the flesh in a good blender or food processor and blend until smooth. Next, since pumpkins vary in size, put the puree into a bowl and then measure 2 cups of pumpkin puree and return it to the blender. (No need to wash or rinse the blender in between!) Reserve any extra puree for Pumpkin French Toast Bread Pudding.

Add the spices, eggs, honey, milk and cream to the blender and mix until everything is uniform and smooth. Pour into the pie crust shell. Bake for 50 to 55 minutes or until the center is set. Serve warm or room temperature.

Options for serving:

Use leftover crust to make “cookies” in the shape of leaves. Sprinkle with cinnamon and sugar. Bake them for 10 minutes or until golden. Kids love to help with this!

Decorate with a spicy pepita (pumpkin seed) brittle. See the next post for the brittle recipe.

Serve with maple whipped cream, recipe follows.

For gluten-free friends, pour some of the pumpkin batter into single serving oven-safe custard bowls or ramekins. Bake about 25 minutes until set. Decorate with spicy pepita brittle for some crunch and texture.

Real Pumpkin Pie - gluten free option

Maple Whipped Cream

  • 1 cup of heavy cream
  • 1 Tablespoon of maple syrup

In the clean bowl of a mixer, beat the cream and maple syrup on high until soft peaks form. Keep refrigerated.