Category Archives: Backyard Goats

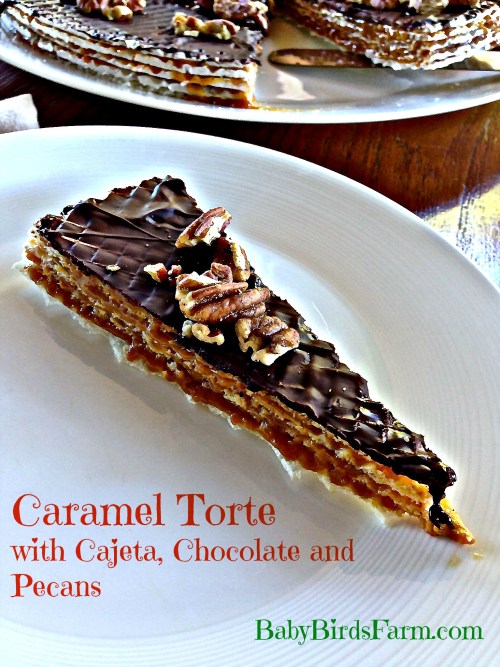
Caramel Torte with Cajeta, Chocolate and Pecans

As I add photos to this post, I have to get up and grab another slice of the Caramel Torte. It is deceptively simple to make with just four ingredients: cajeta (or another form of caramel), wafers, melted dark chocolate and salted, toasted pecans.

Caramel Torte Recipe with Chocolate and Pecans

I have been making cajeta out of our extra goat’s milk for some time in the form of a syrup. Click here to read more about cajeta and see a recipe with step by step photos and directions. But I have been wanting to experiment with making it thicker, more like candy, and when I stumbled upon torte-sized wafers in a local ethnic store, I thought they would be a perfect vehicle for cajeta. I reduced the cajeta down further than I usually do (from 2 quarts of milk to 2 cups of caramel instead of 3-4 cups of syrup) and added a pinch of salt. It was pretty delicious layered between the wafers, but I had to take the caramel torte to the next level by pouring dark chocolate and sprinkling on toasted, salted pecans on top.

Caramel Wafer Torte Recipe

Caramel Torte Recipe

  • 2 cups of caramel, dulce de leche or cajeta
  • 1 package of torte-sized wafers
  • 3 oz. of dark chocolate
  • 2 handfuls of salted pecans

Step 1:

(If making cajeta. Otherwise, store bought is fine.) Use the recipe and instructions for cajeta. Cook further until dark and thick, or reduced to approximately 2 cups, and stir in a pinch of salt.

Step 2:

Chop the chocolate and melt in a double boiler. Allow to cool. Toast the pecans in a dry pan and allow to cool. (I keep my nuts in the freezer. If yours are room temperature and roasted, you can skip toasting.)

Step 3:

Assembling. Spread the caramel or cajeta on top of a wafer. Continue to alternate layers of caramel and wafers until one or both are used up. Finish with a wafer. Spread the melted chocolate on top. Finally, sprinkle the pecans over the top. Chill in the fridge for at least one hour before cutting and serving.

Caramel Torte Recipe with Chocolate and Pecans

Click on any of the thumbnails in the gallery below to see enlarged, step by step pictures.

I hope you enjoy it and share!

Caramel Torte with Cajeta, Chocolate and Pecans

Part Two: Making Cheese with Young Kids

Thought I’d share some quick pictures I took on the second day of making chèvre with my daughter. Check out my original post on making goat cheese for step by step instructions and the recipe. I recently shared how she liked to sprinkle in the chèvre starter and stir the pot. Today she spontaneously played cheesemaking with her toy pot and spoon, saying, “Stir milky.” She also enjoyed putting salt on a plate for rolling the logs. (Check out this post for more ideas on cooking with babies and toddlers.)

homemade chèvre hand formed logs

Here are some of the logs we made out of the goat cheese. Shown are one plain, two with black truffle salt and Little Bird’s cranberry. This batch came out a little dry, so I mixed in a few splashes of fresh milk along with some salt before shaping the logs. Can you guess which one Little Bird helped shape? She loved getting the cranberries ready, but once we formed the log she had a minor temper tantrum when I wouldn’t let her stuff the entire log into her mouth, squeezing it in both hands like a burrito.

Homemade goat cheese with cranberries.

She finally got to enjoy the fruits of her labor during her after-dinner cheese course. She’s Euro like that.

Making Cheese with Kids

Making fresh goat cheese (chèvre) at home is so easy even a young child can do it! My toddler LOVES to be involved in the kitchen and we believe it helps teach her healthy habits and attitudes about food. It is time to make a fresh batch of chèvre and here are some quick shots of Little Bird demonstrating how we enjoy making cheese with kids.

Making Cheese with Kids

In the above picture, Little Bird is holding a digital thermometer in the milk to make sure it is the right temperature. (I accidentally overshot 86°, and had to put it in a cold water bath to bring it back down. I learned the hard way, do not put your starter in milk that is too hot, i.e. over 90°, or it won’t set. It won’t “go bad” or make you sick but it will be more like buttermilk or runny sour cream than nice, sweet cheese.) Below she is sprinkling in chèvre starter.

making cheese with kids - adding chèvre starter

For all the details of how to make chèvre, including step by step instructions with pictures, please click here. And for more on how to involve very young children and babies in cooking, please read this post.


Baby Goats! (…Which Means Fresh Milk!)

I’m so excited! Yesterday we received our first milk delivery in a while. As I explained in my Home Dairy 101 post, we are members of a goat co-op and receive fresh milk weekly. We actually haven’t been receiving milk for the last few months as all of the does have been pregnant and just had their babies.

SAM_1225

Springtime is for babies! I know I claimed that there was nothing cuter than a baby chick in the post on how we hatched chicks without a rooster, but these baby goats are pretty cute!

SAM_1601

Many thanks from Cari at White Mountains Ranch for the use of her photos, as well as taking such excellent care of our goaties. You can see more of the goats and their babies here.

Even if you don’t own goats (or a part of a goat) spring is the best time to buy fresh goat milk at farmer’s markets and other stores. Not sure what to do with fresh goat milk? Brush up on how to pasteurize milk at home, homemade cajeta, and how easy it is to make goat cheese (chèvre) at home. I hope to add some posts soon on ricotta, feta, and a mold-ripened goat cheese, inspired by Humbolt Fog.

Click on any picture in the gallery below to enlarge.


Cajeta Recipe: Step by Step with Pictures

Before living on the Bird Family Farm in a quiet part of San Diego, I lived in the neighborhood of North Park. Well, my side of the street was North Park, but across the street was City Heights. Also across the street was a small, family run Mexican market. They had fresh tortillas and Mexican canned goods, cheeses and candies. I love caramel, and was buying these round candies labeled “cajeta” for a while before I figured out that the picture of a goat on them probably meant that it was made with goat milk. It was too late to be grossed out as I was already a fan. The slight tang from the “goatiness” balances out the sugary sweetness better than cow’s milk can.

Fast forward to this spring and with my first surplus of goat milk from our co-op I knew I wanted to try making some form of goat milk caramel. I found a recipe for Rick Bayless’ cajeta caramel sauce and haven’t turned back. I’ve been a fan of Rick Bayless ever since I saw his show on PBS. If you are not familiar with him, he is a white American guy who makes Mexican food look authentic and delicious. I remember that in the first show I saw he was featuring a recipe called Chiles en Nogada and I was dying to try it. (I’ve since had it here in San Diego and in San Jose del Cabo, Mexico.)

Pronounced “ka-HEY-ta,” cajeta is traditionally made from goat milk and sugar, slowly reduced and caramelized. Think of dulce de leche meets sweetened condensed milk. It is often served as a syrup over pancakes and cakes or stirred into coffee. I like to add a vanilla bean to the recipe. Not only are the black flecks beautiful, it adds an almost custardy taste to the cajeta.

This is NOT a “quick and easy” recipe. Plan on the cooking taking an hour and a half. You do not need to stir constantly until the very end, but during most of the cooking you do need to stir periodically, scraping the bottom and the sides with a heat proof spatula. The only tricky part is feeling confident on when to stop cooking it. But no worries there! It’s just a matter of preference. Reduced less time it will be more syrupy, and cooked longer it will be thicker, almost pudding like when chilled.

Cajeta Recipe: Step by Step with Pictures

Recipe adapted minimally from Rick Bayless’ Cajeta  •  Makes about 3-4 cups

  • 2 quarts goat’s milk or a combination of goat’s milk and cow’s milk—or even with all cow’s milk (use whole milk in all cases)
  • 2 cups sugar
  • 1/2 of a cinnamon stick
  • 1 vanilla bean, split lengthwise and scraped
  • 1/2 teaspoon baking soda dissolved in 1 tablespoon water

1.  Simmer the cajeta.   In a large (6- to 8-quart) pot, combine the milk, sugar and cinnamon stick and set over medium heat.  Stir regularly until the milk comes to a simmer (all the sugar should have dissolved by this point). Remove the pot from the heat and stir in the dissolved baking soda—it’ll foam up if the goat’s milk is acidic. When the bubbles subside, return the pot to the heat.

Adjust the heat to maintain the mixture at a brisk simmer (too high and the mixture will boil over; too low and the cooking time will seem interminable). Cook, stirring regularly, until the mixture turns pale golden, more or less one hour.

Now, begin stirring frequently as the mixture colors to caramel-brown and thickens to the consistency of maple syrup (you’ll notice the bubbles becoming larger and glassier).  Stir regularly so nothing sticks to the bottom of the pot. Test a couple of drops on a cold plate: When cool, the cajeta should be the consistency of a medium-thick caramel sauce.  If the cooled cajeta is thicker (almost like caramel candy), stir in a tablespoon or so of water and remove from the heat; if too runny, keep cooking.

2.  Finish the cajeta.   Pour the cajeta through a fine-mesh strainer set over a bowl or a wide-mouth storage jar.  (Or simply fish out the vanilla pod and cinnamon.) When cool, cover and refrigerate until you’re ready to serve.  Warming the cajeta before serving makes it extra delicious.

Notes:

Cajeta keeps for a month or more in the refrigerator.  Keep it tightly covered to keep it from absorbing other flavors. I have also frozen it, although for only a month, and the defrosted cajeta was just as good.