Category Archives: Recipes to Make with the Kids

Honey-Sweetened Meyer Lemon Curd

Our citrus tree is bursting with Meyer lemons. Baby Bird, who is 14-months-old and walking, loved picking the lemons. Meyer lemons are sweet and juicy and made a great lemon curd.

honey sweetened meyer lemon curd

baby bird picking meyer lemonsI have been trying to feed us less refined sugar this year. I find that our taste buds are slowly adjusting. For example, my husband and I don’t sweeten our coffee anymore. Meyer lemons are naturally sweeter than a conventional lemon. This recipe came out delicious sweetened with just honey, and I used a fraction of the amount of sweeteners other curd recipes use.

honey sweetened meyer lemon curd over blueberry pancakes

Little Bird is 3-years-old now and is quite the pro in the kitchen. She loves cooking projects. She loves to taste all of the ingredients, but at one point I had to pull the honey away from her. I think she ate half the container. (So much for limiting our sugar!) The lemon curd was perfect over Papa Bird’s famous gluten-free blueberry pancakes. I also used it to make a quick lemon-meringue tart with a (gluten-free) cashew/almond crust. Since my curd uses only egg yolks, a meringue was a perfect way to use up all of the whites.

Honey-Sweetened Meyer Lemon Curd
Author: 
Recipe type: Dessert
Cuisine: American
Prep time: 
Cook time: 
Total time: 
Serves: 3.5 cups
 
This version of a classic lemon curd uses honey to sweeten. I used grass-fed butter, but it could also be made with coconut oil for a vegan version. I recommend using organic citrus anytime you are using the zest or peel.
Ingredients
  • 1 tablespoon lemon zest (from approx. 5-6 lemons)
  • 1 cup lemon juice (the juice of approx. 5-6 lemons)
  • 8 oz butter, room temperature
  • ½ cup honey
  • 8 egg yolks
Instructions
  1. Rinse the lemons and use a microplane to grate the zest of the lemons. Set aside.
  2. Juice the lemons until you have about 1 cup of juice. Set aside.
  3. Place water in a 2 quart saucepan on the stove and bring to a boil. Place a double boiler or bowl on top of it.
  4. While the water is coming to a boil, place the butter in the bowl of a mixer. Beat until light and fluffy. Add the honey and beat well. Then add the egg yolks one at a time and mix in. Then slowly add in the lemon juice. It is okay if it is not totally smooth in the mixer, because the butter will melt in the next step.
  5. Pour the mixture into the top of the double boiler or the bowl over the pot. Occasionally, stir gently with a heat proof spatula. Heat the mixture until it comes up to 170*F. At that point it should be smooth but not necessarily thick.
  6. Pour into jars for canning, a crust for a meringue, or store in the fridge. Allow to cool completely. It will thicken as it cools.
  7. Keeps in the fridge for 1 week and freezes well.
Notes
From this size recipe, I used two cups of the curd in a tart/lemon meringue pie and used the remaining 3 pints as curd. If you want a super smooth texture, strain the curd after taking it off the heat to remove the zest. I left it in and liked it.

meyer lemon curd ingredientsGet all of the ingredients for this recipe ready ahead of time and then it will be easy to throw together. Just watch out for three-year-old honey swipers!

No fancy equipment is required, but a kitchen-aid mixer helps get a creamy texture and a microplane make zesting citrus much easier. A double-boiler let me not worry about scorching the bottom while it cooked and a thermometer let me know exactly when to take the curd off the heat.

Click here to pin this recipe on Pinterest.

Honey-Sweetened Meyer Lemon Curd from @BabyBirdsFarm

Disclaimer: Links to products on Amazon contain my affiliate id, meaning I could receive a small referral fee for qualified purchases. If you purchase  a product I recommend or nearly anything else from Amazon through one of these links it helps support our web hosting and keeps this blog going! Thank you kindly.

Easy Cranberry Clementine Sauce

My sister Marjorie has been making a fresh cranberry sauce for Thanksgiving since she was a teenager. She shares her recipe for easy cranberry clementine sauce every year, since I never write it down. I’m happy to share it here because now I will be able to look it up next November, too! This is also a fun recipe to make with kids.

easy cranberry clementine sauce recipe

Easy Cranberry Clementine Sauce
Author: 
Recipe type: Thanksgiving
Cuisine: Easy Vegan
Prep time: 
Cook time: 
Total time: 
 
An easy homemade recipe for cranberry sauce made with clementine juice and peel. Perfect for Thanksgiving.
Ingredients
  • 12 ounces of fresh cranberries (1 bag)
  • 1 clementine orange, juice and peel
  • 1 cup of water
  • 1 cup of sugar
Instructions
  1. Rince cranberries. Juice the clementine and chop the peel in a small dice.
  2. Place all of the ingredients in a small sauce pan. Bring to a boil and cook for 10 minutes. Cool slightly and serve.
  3. May also be refrigerated up to one week and served cold.

Pin the recipe to save. Please follow my Thanksgiving board on Pinterest for more ideas!

cranberry clementine sauce

Baby Birds’ Pumpkin Smash Cake with Cinnamon Frosting – Gluten Free and Low Sugar

I’m very excited to share the recipe I developed for a healthy and delicious pumpkin smash cake! Baby Bird’s Banana Smash Cake is one of my most popular posts on Pinterest and in search engines. It is a healthy cake with no refined sugar or artificial coloring. This year we went pumpkin picking to celebrate both our youngest Baby Bird turning 1 and Little Bird turning 3. So of course we had to have a PUMPKIN smash cake and pumpkin cup cakes. I kept the sugar low by using just half a cup of maple sugar. Although we are not gluten-free, so many of our friends are. To be perfectly honest: these came out BETTER than the traditional cup cakes I made for the guests.

Pumpkin Smash Cake with Cinnamon Cream Cheese Frosting - gluten free and low in sugar

The cinnamon frosting is mostly cream cheese with a little grass-fed butter. I wanted to use maple syrup to sweeten it, but we were out. I ended up using a little organic powdered sugar, but less than a quarter of what most recipes call for. Our pumpkin picking party fell on an unseasonably hot 100° day… the candy pumpkins on top of the smash cakes started melting. But the cake was delicious and I can’t wait to make it again! Maybe as a full-sized layer cake.

Healthy Pumpkin Smash Cake

Gluten-Free Pumpkin Smash Cake Recipe

Prep: Let all ingredients for the pumpkin smash cake sit out at room temperature. Cut a circle of parchment paper to line the bottom of 1 or 2 ramekins. Grease well with butter. Line a muffin tin with a dozen cupcake liners for the rest of the batter. Preheat oven to 350° F.

In the bowl of a good mixer, add:

  • 12 tablespoons of softened butter
  • ½ cup of maple sugar (brown sugar would also be nice)

Beat on high until light and fluffy. Add

  • 3 eggs, ideally at room temperature

Add eggs one at a time, mixing after each until well combined. Add

  • ½ cup of milk
  • ½ cup of yogurt

Mix well. Add

Mix on slowest speed until just incorporated, then add

  • 2 cups of pureed, cooked pumpkin OR 1 (15 oz) can of pumpkin (follow the instructions here if you want to cook the pumpkin from scratch – but I won’t tell anyone if you use the can…)

Mix until incorporated, then add

Scoop into the ramekins and any remaining batter into the muffin tin. Bake the muffin/cupcakes for about 15-20 minutes and the ramekins for about 40 minutes. Cool completely or even overnight before frosting with Cinnamon Cream Cheese Frosting.

Notes:

If you follow this blog, you will know that I am all about making things from scratch. They only time I have mentioned using a mix for anything was when I made my own pancake mix to take camping! But I have to say, I loved using this gluten-free mix! I have had so many not so great gluten free baked goods, and tend to avoid them.  This mix is a household staple as Papa Bird uses it at least weekly for his special pancakes. It was nearly a year before I realized it was gluten-free! I am not affiliated with Pamela’s, although maybe I should be! I am an Amazon Affiliate, though, and do receive advertising fees for qualifying purchases made through links on this site. Thank you for your support!

4.5 from 2 reviews
Baby Birds' Pumpkin Smash Cake with Cinnamon Frosting - Gluten Free and Low Sugar
Author: 
Recipe type: Dessert
Cuisine: Gluten-Free
Prep time: 
Cook time: 
Total time: 
 
A low-sugar, gluten-free pumpkin cake or cup cake recipe, perfect for a healthy 1st birthday party "smash cake."
Ingredients
  • 12 tablespoons of softened butter
  • ½ cup of maple sugar (brown sugar would also be nice)
  • 3 eggs, ideally at room temperature
  • ½ cup of milk
  • ½ cup of yogurt
  • 2 cups of Pamela’s Baking and Pancake Mix
  • 1 tablespoon of pumpkin pie spice blend
  • 2 cups of pureed, cooked pumpkin OR 1 (15 oz) can of pumpkin
Instructions
  1. Let all ingredients for the pumpkin smash cake sit out at room temperature. Cut a circle of parchment paper to line the bottom of 1 or 2 ramekins. Grease well with butter. Line a muffin tin with a dozen cupcake liners for the rest of the batter. Preheat oven to 350° F.
  2. In the bowl of a good mixer, add butter and maple sugar. Beat on high until light and fluffy. Add eggs one at a time, mixing after each until well combined. Add milk and yogurt and mix well.
  3. Add 1 cup of Pamela’s Baking and Pancake Mix and the pumpkin pie spice blend. Mix on slowest speed until just incorporated, then add the pureed, cooked pumpkin. Mix until incorporated, then add 1 more cup of Pamela’s Baking and Pancake Mix.
  4. Scoop into the ramekins and any remaining batter into the muffin tin. Bake the muffin/cupcakes for about 15-20 minutes and the ramekins for about 40 minutes. Cool completely or even overnight before frosting with Cinnamon Cream Cheese Frosting.

Mint Julep Kale Krunchies

Summer in San Diego means the Del Mar Racetrack is open and an abundance of mint in our garden. Both were the inspiration for “mint julep” kale krunchies, our latest variation on kale chips. Using the same technique and creamy cashew base as my Cilantro Lime Kale Chips, these kale crunchies are flavored with the summer drink ingredients. Yes, even a splash of bourbon.

Mint Julep Kale Krunchies

Mint Julep Kale Chips Recipe

  • 1 head of kale
  • 3/4 cups of raw cashews, soaked in water for at least one hour, then drained
  • handful of fresh mint, washed
  • 1-2 tablespoons of agave or coconut nectar
  • 1 teaspoon of bourbon (optional but fun)
  • 1/2 teaspoon of salt, or to taste
  • a little water, if needed, to process in the blender

1. Wash the kale in cold water. Holding the end of the stem in one hand, firmly and quickly slide your other hand down the center rib. The leaves should tear off of the rib in one move. Dry the kale very well and rip any large pieces into smaller bits.

Or – Purchase a bag of kale pre-washed and cut. Just make sure to remove the thick center ribs as they do not dehydrate well. (Little Bird likes to help rip and sort the kale.)

2. Blend the rest of the ingredients in a small food processor, like a Magic Bullet, or blender. If the blender struggles, add a little water, a tablespoon at a time, until it blends well. Blend at highest speed until smooth, scraping down the sides at least once. Keep in mind the more water you add, the longer the chips will take to dry out in the oven.

3. Preheat oven to 200° F. Meanwhile, in a large bowl, massage the “sauce” into the kale. Then spread it onto a baking sheet lined with parchment paper or a silicone mat. Bake for 45 minutes or so, checking and gently stirring the kale occasionally, until it is dried but not overly toasted.

For step by step photos of how to make kale chips, please see my previous recipes for Easy Homemade Kale Chips and Cilantro Lime Kale Chips.

Enjoying the Mint Julep Kale Crunchies with the eponymous drink is optional, but highly recommended!

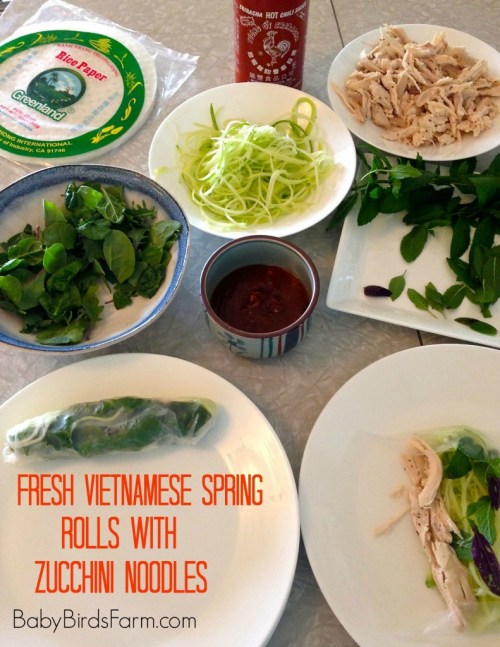
Fresh Vietnamese Spring Rolls with Zucchini Noodles

Fresh Vietnamese Spring Rolls, or gỏi cuốn, are also called salad rolls or summer rolls. They are light and refreshing, and much healthier than fried spring rolls. Over ten years ago my friend, Quentin, invited me over to dinner at his mother’s house. She is originally from Vietnam* and put out a spread of delicious ingredients for us to roll our own fresh spring rolls. I’ve never forgotten it. (*Similar to how I’ve learned a lot of Mexican sweets living in San Diego, we also benefit from a large Vietnamese population here.)

how to make fresh vietnamese spring rolls

I think “Salad Rolls” is a better description for fresh spring rolls, as they are light and fresh with lot’s of greens, herbs and lean proteins. Many restaurants also put in rice vermicelli noodles. I took it one step healthier and used raw zucchini “noodles” made from cutting an enormous garden zucchini with a julienne peeler. Handy gadget. The wrappers are made from rice. The rice paper comes in hard discs that are softened in a few seconds in warm water.

How To Make Fresh Vietnamese Spring Rolls

You can’t get more straightforward instructions than the back of the packaging!

fresh spring roll instructions

Here are my suggested fillings, feel free to only use what you like and to get creative:

  • Grilled Shrimp, Leftover Chicken, Steak or Tofu
  • Salad Greens
  • Fresh Herbs including Thai Basil, Mint, Cilantro , Scallions and Lemon Basil (use a LOT of herbs)
  • Cooked Rice Vermicelli or Raw Zucchini Noodles
  • Chopped Peanuts
  • Bean and Pea Sprouts and other raw veggies

Dipping Sauces for Salad Rolls:

  • The most common is a peanut sauce, easy recipe follows.
  • Another traditional is called nước mắm phawhich is a clear, sweet and sour with a little fish sauce. A girl I once worked with gave me her mom’s recipe, I’ll have to hunt around and see if I still have it.
  • You can’t go wrong with Sriracha!

fresh vietnamese spring rolls with zucchini noodles

Easy Peanut Dipping Sauce for Fresh Spring Rolls

That’s it! Warm in a sauce pan over low heat to mix easier. You can add a little water to thin, if needed.

True story: When I first made these rolls at home, I went to a Vietnamese market in search of peanut dipping sauce. I asked the young man stocking where it was. He didn’t think they had it and asked his grandmother. She laughed and (with her grandson translating) explained they always made it. She swore all you needed was these two ingredients. I usually can’t restrain myself from throwing in a little sriracha and nước mắm, but try it as is!

Shopping Notes:

The best prices are in Asian markets. These ingredients are pretty common, so you can usually find them on the “ethnic” aisle of big grocery stores. If you can’t find them easily, I’ve included some affiliate links to Amazon. Have fun and let me know if you have any questions!