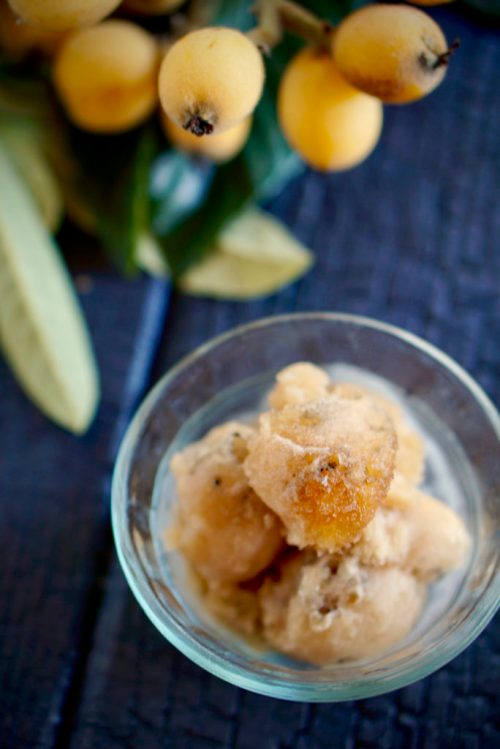
Loquat Sorbet Recipe with Tequila and Salt

Here’s a fun post: a delicious recipe for loquat sorbet made with a splash of tequila and sprinkled with Hawaiian black lava salt.

Loquat Sorbet Recipe using fresh loquats and a splash of tequila and salt

The loquats came from a tree in our backyard. We started it from the seed of a tree down the street and it’s taken off. According to the Specialty Produce App, loquats grow well in most Southern states, but usually only fruit in California, Florida and Hawaii.

Loquat Tree with fruit ready to make into loquat sorbet

This post is a family collaboration! Papa Bird (our sorbet master) came up with the recipe and shot the “making of” photos. The child labor came from the (not so) Baby Birds.

Fresh loquats from the treekids cooking loquat sorbet

Kids Cooking in the Garden

Kids cutting loquats for sorbet with playful chef safety knives

The girls have been honing their kitchen skills with their new knife set. They love the safety knives from Playful Chef (Amazon link) which are designed to cut through apples and carrots, but safely fit in young hands. They use them almost daily.

The kids also harvested the loquats from the tree, selecting the ripest, softest and sweetest fruit.

My kids enjoy cooking, especially sweet treats. And they LOVE making and eating anything from our garden.

How to Make Loquat Sorbet

Loquat Sorbet Recipe using fresh loquats and a splash of tequila and salt

Loquats are from the same family as apples, pears and roses. The fruit have a mild, sweet, slightly sour and refreshing flavor.

loquats on the tree, ready for this sorbet recipe

They grow rampant in Southern California. So check your neighborhood and forage! If you or a friend have a tree, you likely have more fruit than you can deal with. And sadly, there are not very many loquat recipes out there. Select fruit that are a little soft and pull off easily from the branch.

Loquat sorbet

Next, Papa Bird set up an assembly line for the girls outside. The fruit can be juicy and sticky.

Kids Cooking Recipe: Fresh Fruit (Loquat) Sorbet

The kids cut the fruit in half. Loquats contain 3-7 large, hard, inedible seeds in the middle.

fresh loquats with seeds

Remove the seeds. The fruit are now ready to run through a juicer.

loquat sorbet

Preparing the loquat sorbet

This sorbet came out delicious!

Loquat sorbet with tequila and Hawaiian lava salt

To make 2 cups of juice, Papa Bird used approximately 60 halved, seeded loquats. We have a Breville compact juicer, which quickly separated the juice from the skin and less edible parts.

Read the printable recipe below. Continue reading

Raw Honey Face Mask

Why, hello! Happy 2018. It’s been a minute. Did you know that honey is not only a delicious treat? A raw honey face mask is an easy, affordable way to leave your skin radiant and pores refined, without any unwanted additives. Look! Me with no makeup.

“After” Raw Honey Face Mask

A Raw Honey Face Mask leaves skin radiant and pores refined

It turns out, honey is not just good for baking! We give the Little Birds honey when they have a cough or sore throat. I’ve long known about it’s antibacterial properties and heard it’s good for skin. A friend uses raw honey as a face wash.

This week, I was taking a close look at my pores, and figured honey couldn’t hurt. I also tend to have red patches on my skin. The lady I see for facials thought my skin could be sensitive to seasonal allergies. Which made me think of how local pollen, or honey such as San Diego Honey’s Pollen Plus, soothes seasonal allergies. Why not applied topically?

How to apply raw honey as a face mask

  • Over just washed, clean skin, I took a little raw honey and simply spread it over my face with my fingers, focusing on the T-zone, and avoiding my hair line.
  • Leave on 20-30 minutes. If you want to take a steamy bath, it couldn’t hurt, but I did not. Rinse with warm water. No need to wash off with soap (please don’t!)
With Honey Face Mask On

Raw Honey Face Mask. Apply to face, leave on 20-30 minutes, rinse.

My results from using a raw honey face mask

  • My skin felt very soft
  • My skin felt well-moisturized
  • Pores were clean, refined and smaller
  • Skin tone (aka red patches) were evened out considerably
  • My skin had a radiant glow, as though glowing from within, but not looking shiny or oily.

I should add that I am not wearing any makeup on my skin in the “after” photo. To be honest, I may have cheated a little bit with my eyebrows. If you look at the before photo, you’ll see why! (For those that are curious, I’m wearing Benefit’s Ka Brow in shade #3.) But honest to goodness, no foundation, tinted moisturizer, or concealer (nor photo-retouching) — I wanted to show off how nice the honey left my complexion.

Which honey should you use for a face mask

The most important step is selecting raw honey. Alternatively, honey that has been cooked or processed looses many of its helpful properties. If you are in Southern California, I recommend the San Diego Honey Company, to get the most benefits of local honey. You can buy online or pick some up at Specialty Produce (below.)

San Diego Honey Company at Specialty Produce

Personally, I picked Buckwheat Blossom Honey as it has an extra high level of antioxidants and is known for its health benefits. Other good choices include the hyperlocal Coastal Wildflower or the Pollen Plus. A citrus infused or the ginger lemon honey might make an interesting honey face mask, too.

RAW HONEY FACE MASK

Have you ever used honey as skincare? Want to try it? Pin this article to save it for later!

Honey Bourbon Pecan Pie [New Recipe]

The fall flew by! Can you believe it is almost Thanksgiving? I am thankful for extra time off with my children. We love to get creative in the kitchen, especially when it comes to sweets. We were talking with our friend from the San Diego Honey Company about how we like to bake with unrefined sugars, such as local honey. We put our brains together and collaborated on this Honey Bourbon Pecan Pie. See if you might like to try it for Thanksgiving dessert!

honey bourbon pecan pie

If you have seen my recipes for Chocolate Espresso Pecan Pie or Pumpkin Pie, you will know that I try to steer clear of corn syrup. I also often reduce sugar in my recipes. Honey adds subtle layers of flavor that compliment the other ingredients. Why not add flavor and avoid GMO’s?

honey bourbon pecan pie

To be honest, I bake the Chocolate Espresso Pecan Pie every year. It’s just a winner. But this year I wanted to experiment with something new. Since bourbon goes so well with honey and pecan, I figured this one couldn’t go wrong.

baby birds farm eggs

To select which honey to use, I picked the brain of Lisann, who owns the San Diego Honey Company, and makes the infused flavors herself. You can talk to her directly at the Solana Beach Farmers market every Sunday. I also pick up her honey at Specialty Produce or Sprouts. (The super fresh pecans were from Specialty Produce.) I asked her which honey would go best in this recipe. “Vanilla Bean!” she said. The vanilla bean honey has a ton of flecks of real vanilla, which compliments the sweet custard of a pecan pie.

honey bourbon pecan pie

Next, I thought about my mom’s classic pecan pie recipe. It uses half a cup of light corn syrup and half a cup of dark corn syrup, as each have their own flavor notes. To mimic the match, I used half vanilla bean honey, which is in a light honey base, and half avocado blossom honey. If you have never had the pleasure of tasting avocado blossom honey (sounds like a total San Diego thing), it is super dark and tastes like molasses. For reals.

honey bourbon pecan pie

The only difference in baking with honey vs. corn syrup or maple syrup, is that you will want to heat it up slightly. This helps it to mix much easier, especially if other ingredients are cold. I warmed the honeys, brown sugar, and butter until just melted, and then let them cool before mixing with the rest of the ingredients. Do you bake or cook with honey?

honey bourbon pecan pie

Honey Bourbon Pecan Pie [New Recipe]
Author: 
Recipe type: Dessert
Cuisine: American
Prep time: 
Cook time: 
Total time: 
 
Try this twist on a classic American pecan pie this Thanksgiving. Honey replaces corn syrup and adds extra flavor, complimenting the sweet bourbon.
Ingredients
All Butter Pie Crust
  • 8 ounces of unsalted butter
  • 2 cups of flour
  • ½ tsp salt
  • ice water, about ½ cup
Honey Bourbon Pecan Pie Filling
  • ½ cup dark honey, such as avocado blossom honey
  • ½ cup light honey, such as vanilla bean honey
  • ½ cup brown sugar
  • 3 T butter
  • 3 eggs
  • 3 T bourbon whiskey
  • 1-2 tsp vanilla extract
  • (optional) dash of cardamon bitters
  • 2 cups of raw pecan halves
Instructions
All Butter Pie Crust
  1. Cut the butter evenly into small pieces, place on a plate in the freezer, and chill for about 30 minutes. Put ice and cold water in a measuring cup and chill.
  2. Place flour and salt in the bowl of a Kitchen-Aid mixer. When butter is frozen, use paddle attachment with mixer on the very lowest setting, and drop butter in a few pieces at a time. Stay close by. When the chunks of butter are slightly larger than pea size, dribble in the ice water until dough does not appear dry and JUST begins to come together.
  3. Move the dough to a dry surface and push together with the heel of your hand. Try not to knead or overwork the dough, you want it to come together so you can roll it out. This dough can be used right away! This amount makes enough for a top and a bottom, or two bottom crusts. You will only need one half for the pecan pie. If you are not going to use it right away, double wrap it in plastic and refrigerate for 3-4 days or freeze for up to a month.
  4. After rolling out the crust and gently placing it in your pie dish, place it back in the refrigerator until it is ready to be filled.
Honey Bourbon Pecan Pie Filling
  1. Preheat oven to 375*.
  2. Place the honeys, brown sugar and 3 T of butter in a saucepan on medium heat. Tip: you will want a spatula to scrape all of the sticky honey out of your measuring cups. Heat, stirring occasionally, until butter and sugar and just melted. Take off heat and let cool to room temperature.
  3. Lightly beat eggs by hand. Add bourbon, vanilla and bitters. (Use the larger amount of vanilla extract if your honey doesn't have awesome flecks of vanilla already in it.)
  4. Once the honey mixture has cooled, gently stir it into the eggs and pecans, until just combined. Pour into the prepared, unbaked, half pie shell.
  5. Bake for 35-40 minutes, or until just set in the middle (meaning there is no jiggle when you wiggle.)
  6. Let cool completely.
Notes
For more photos of and tips on this crust and baking pies, see this post.

Pin this Honey Bourbon Pecan Pie Recipe

Save this, or other Thanksgiving favorites, to Pinterest!

Honey Bourbon Pecan Pie Vertical


Giveaway: New Ergobaby Omni 360 Baby Carrier

I am beyond excited. First, we giving away a brand new Ergobaby Omni 360 baby carrier. Second, I get to share these beautiful pictures by our friend and photographer, Alysha Rainwaters.

Ergobaby Onmi 360

Recently, Ergobaby asked if I wanted to review their newest baby carrier, just released last month. The Omni 360 combines the best of the 360 with the Adapt, which converts from newborn on up. The Ergo 360 (which you might remember from my video review with Baby Bird and from this guest article) is seriously the best forward facing baby carrier. Until now.

Compare Ergobaby Omni, Adapt and 360

The major improvement with these new, flexible baby carriers (the Omni and Adapt) is that they can be worn without an infant insert – even with brand new little bitties. Infant inserts are great but can be hot. We love this simplicity in hot San Diego.

Not sure how to wear them? Ergobaby has great videos on YouTube showing how to wear the different styles, like this one. For help in person, I always recommend finding a local Babywearing International group, too.

Ergobaby Omni 360

Reviewing the new Ergobaby Omni 360

I’m a fan of everything Ergo does. So I was thrilled by the offer to review the Omni. Only problem? My littlest Baby Bird is almost four! Luckily our friends Alysha and Matt Rainwaters have two beautiful girls, including the adorable Coco. Sadly they are in the midst of moving away from us in San Diego back to Austin, Texas. Alysha said that her cutie has been super clingy and she hadn’t been able to put her down to pack.

best front facing baby carrier

When I brought the carrier over to their house, little Coco intuitively gravitated towards it. She wanted her mom to wear her immediately! Her little smile once she was up was priceless.

favorite forward facing baby carrier

Here’s Alysha’s review of the Omni 360:

I had given up on wearing Coco and hadn’t put her in a carrier in a couple of months because she couldn’t get comfortable forward-facing in our previous carrier. I was so so excited to try the Ergo because I missed feeling close to her and kissing and smelling her little head. Sure enough, she loves the Ergobaby and actually sits still, which frees my hands to wrangle my older daughter. I’ve also noticed that my back never hurts while wearing her and I can hold her for longer! Yay!

Ergobaby Omni 360 Forward Facing

Babywearing is Good for Parents’ Mental Health

Obviously, I’m a big fan of babywearing. In my private practice, Burd Psychotherapy, specializing in postpartum mood and anxiety disorders, I often recommend babywearing to ease mom’s anxieties. You can multitask. More importantly, babywearing increases bonding, attachment, and attunement. In fact, I wrote a blog for Ergo on How to Prevent Postpartum Depression, which includes wearing baby close.

Ergobaby Omni 360

Continue reading

Kid-Made Almond Pulp Granola

Any time you cook with kids expect a mess. Multiple your prep time by three. Your results may not be as pretty or as perfect. Then again, kids cooking means kids more likely to try new food, having fun/bonding, and absorbing math and science!

Almond Pulp Granola with Mixed Nuts and Cinnamon

Would you like to see our last project? We made homemade almond milk. And with the unanticipated byproduct of leftover almond pulp, the kids made the most delicious almond granola — too tasty not to share.

Homemade Almond Milk Adventures

When the girls and I decided to try making almond milk at home, we picked up raw almonds at Specialty Produce. After soaking for a day, we ground the almonds in a Vitamix and strained it through cheesecloth leftover from my cheese-making days. If you are serious, you can buy a nut milk bag. If you just want to experiment, you can even use an old pillowcase or dishtowel to strain. It tastes really grainy if you don’t strain. But if you would like to try a nut milk that doesn’t need to be strained, I recommend cashews, like this raw cashew “horchata” recipe.

Vanilla Honey Almond Milk and Dark Chocolate Milk

We made a batch of vanilla bean honey almond milk (sweetened with the vanilla bean honey from San Diego Honey Company) and a dark chocolate almond milk. The basic vanilla recipe I found here and would make again. The chocolate recipe used melted chocolate, and wasn’t as smooth as I would’ve liked. Next time I’ll try raw cacao instead.

Watch this video of me milking nuts, lol…


Straining the almond milk through the cheesecloth reminded me so much of making cheese back in the day! It’s been nearly five years since I posted this step-by-step pictures guide to making fresh goat cheese (chèvre) – one of my most comprehensive posts ever. Little Bird used to help add the chèvre culture and roll the logs before she was even two.

Except when you make cheese, the liquid, or whey, is the waste, and the solid is the good stuff you are going for. Making almond milk, the reverse was true. In fact, the leftover almond pulp – which could’ve been just discarded, reminded me in texture of fresh ricotta. Which got me thinking…

Leftover Almond Pulp Makes Great Granola!

We ate a bunch of the almond pulp – which really needs salt – as a snack. I thought it could be interesting as a vegan stuffed pasta filling. Not to mention, it’s a fresher version of the almond meal I buy for baking. However our winning idea was granola!

Almond Pulp Granola with Mixed Nuts and Cinnamon

Drying Out the Almond Meal – Edible Kinetic Sand

Almond pulp leftover from making almond milk makes great granola

The girls had fun spreading out the almond pulp on a baking sheet to dry it out. Use your hands! Such good sensory fun and… it totally feels like kinetic sand! Seriously, you have to try it.

You dry out the pulp in a 200° oven for a few hours, checking it and stirring and breaking it up once an hour. You want the moisture mostly gone. A little browning is fine, but don’t burn any of it.

The result is “healthy looking” aka kind of a bland, crunchy thing. But once you add all the good stuff, it blends right into the granola, giving it extra body.

Making Almond Pulp Granola

Almond pulp granola

Please improvise with your favorite ingredients. We threw in whatever nuts we had in the freezer! Have fun with it.

Kid-Made Almond Pulp Granola
Author: 
Recipe type: Easy
Cuisine: Vegan, gluten-free
 
Don't throw away the leftover almond pulp when you make homemade almond milk! It gives body to the most delicious granola. Not to mention, the granola and homemade almond milk taste amazeballs served together!
Ingredients
  • Approx 1 cup of pulp from making almond milk from raw almonds
  • 1 cup of rolled oats or old-fashioned oats
  • 1 cup to 2 cups of raw nuts and seeds (we used a mix of walnuts, pistachios, pepitas, slivered almonds and chia seeds)
  • ¼ cup of unsweetened, shredded coconut (optional)
  • ¼ cup of melted coconut oil
  • 3 Tablespoons of maple syrup
  • 1 teaspoon of cinnamon
  • 1 teaspoon of vanilla extract
  • ¼ teaspoon of salt
Instructions
  1. First, if using leftover almond pulp from making almond milk, spread out the pulp in a thin, even layer on a baking sheet lined with a silicone mat or parchment paper. Bake in a 200* oven. Check it after two hours, breaking up, stirring and flipping the pulp. Bake for another 1 to 2 hours, checking and stirring periodically, until mostly dried.
  2. Next, allow the almond meal to cool, then add it and all of the rest of the ingredients to a medium-sized mixing bowl and stir.
  3. Finally, spread the mixture in an even layer on a baking sheet lined with a silicone mat or parchment paper. This time bake at 275* for 15-25 minutes, or until lightly brown and toasted. Let cool.
  4. IMPORTANT: Don't mess with it or break apart the giant granola bar until it has cooled for one hour. Then break it up into big chunks and store in an air-tight container.

Have you ever made homemade almond milk or granola?