Tag Archives: homesteading

Alice Water’s Simple Tomato Sauce with Meatballs

Ever since a friend posted a picture of canning this tomato sauce recipe by Alice Waters, I’ve been wanting to try it. The owner of the legendary Chez Panisse in Berkeley, Waters is well known for pioneering California cuisine and championing organic and local food. I begged my friend to share the recipe and once she finally did I was shocked at how simple it was. (I also thought it kind of reminded me of this simple tomato sauce I threw together the other day.)

20120906-215047.jpg

My sister and her fiance were visiting from Portland. She teaches science and shared that she had recently been reading an article on why homegrown Heirloom tomatoes taste so much better than commercially produced, genetically modified and supermarket sold “tomatoes.” According to the article in Scientific American, “a tomato’s flavor depends not only on the balance of sugars and acids within the fruit, but also on subtle aromatic compounds.” These compounds are called “volatiles”, are largely lacking in supermarket tomatoes, and the rarest of which make for the tastiest of tomatoes.  –We always knew we were on to something, right?

In a sauce this simple, the freshness and quality of the ingredients really shine. We served it with our favorite meatball recipe, hearty penne pasta and freshly grated parmesan.

Step by Step Tomato Prep

Cut or obtain 2 pounds of tomatoes. I had been wanting to try out our new kitchen scale.

20120906-215109.jpgEscali Arti 15 Pound, 7 Kilogram Digital Scale

It’s cute, huh? It is the size of an iPad and also comes in fun colors, like purple. It has a hold function, but it was quick and easy to put another (identical) empty bowl on the scale and zero it out.

20120906-215126.jpg

Although the recipe calls for 2 pounds, I happened to have 2 pounds and 5 ounces and just rolled with it.

20120906-215158.jpg

I washed and scored the tomatoes. Please see this post for step by step directions on how to easily peel tomatoes.

20120906-215211.jpg


Simple Tomato Sauce Recipe by Alice Waters

Peel, seed and dice 2lbs of ripe tomatoes. Save the juice, strain out the seeds, and add the juice to the diced tomatoes.

Peel 5 large garlic cloves. Smash them and chop coarse. Put a heavy-bottomed pot over medium heat and when hot, pour in 1/4 c. extra-virgin olive oil. Add the garlic and when it starts to sizzle, immediately add the tomatoes and their juice with a large pinch of salt.

Cook at a simmer for 15 minutes. For a smooth sauce, pass through a food mill.

Variations: Add a handful of chopped parsley, marjoram, or oregano or a chiffonade of basil leaves to the sauce a couple of minutes before it is done. Saute 1 small diced onion in the oil before adding garlic. Add a whole dried chile or a pinch of dried chile flakes for spice.

20120906-215250.jpg

I used just the tomatoes, garlic and basil. I was going to use the pepper from our garden but I really wanted to test out the basic sauce. It’s surprisingly flavorful! I did end up sautéing the pepper with zucchini and onions from the garden. We served the veggies, sauce and fresh parmesan over hearty penne with meatballs made by Papa Bird.

Home Dairy 101: How to Pasteurize Fresh Milk at Home

Backyard goats are the new chickens!

pic courtesy White Mountains Ranch

We don’t actually have goats in our backyard. But we are part owners in a goat co-op. We contributed to the purchase of five dairy goats (four already milking and one yearling) and help pay for their feed and keep each month. They are boarded on a small ranch just east of the city and are fed organic feed and lovingly cared for by our friend and source for all things chicken. We receive 1-2 gallons of fresh milk each week. I love it when there is a little extra to play with and have so far made various cheeses, kefir and cajeta. (Subscribe to the blog for those recipes which are coming soon.) We haven’t bought any cow, soy, rice, almond or other milk since.

http://www.whitemountainsranch.org/

Up until now I have shared primarily recipes that I thought would interest a wide selection of people. I realize that very few people in America need to pasteurize milk at home. The vast majority of milk sold is already pasteurized and those drinking raw milk have likely gone to a great deal of expense and trouble to find it. Raw milk is legal here in California (but heavily monitored and restricted) and it cannot be bought in many states.

I wasn’t really intending to get into the whole pros/cons of raw milk… to be honest we never sought it out. We were interested in joining the co-op so that we knew where our milk was coming from. We like that it is from a very small ranch and that we know how the animals are being treated. We are confident that they do not receive hormones or unnecessary antibiotics. We decided to give it a shot. We did not intend to give raw milk to Baby Bird ever, nor would I have wanted to drink it if/when pregnant again. The milk tastes surprisingly good. It tastes less “goaty” then goat milk I have had from the store. And to tell the truth, the raw milk really does taste better….

But… my husband and I were drinking the milk for about four months without issue until one of my cheese recipes required the milk to sit at room temperature for 24 hours. We each had only one bite of the cheese as it tasted really “wrong.” Unfortunately, the 24 hours had encouraged the growth of not only the good cultures but also some yucky bacteria. (In our case, campylobacter.) We were sick, as in drink-the-water-in-Mexico-sick, for two weeks. I am so grateful that our baby never had any.

Our milk is handled under safe and sanitary conditions. It could’ve been a fluke that one of our bottles, one time, got one or two little germies, and the cheese making process was perfect conditions for multiplying them to a critical mass. I personally believe now that drinking milk raw was like playing Russian Roulette. <Sigh.> Too bad since it tasted so good.

Luckily, there is a very easy fix! Now I err on the safe side and pasteurize all of our milk (including sterilizing bottles and equipment) before drinking it or using it in any dairy making.

So why would YOU be interested in learning how to pasteurize milk at home? Here are some reasons why this is an important skill:

  1. You may get your own goats or purchase some raw milk at a farmer’s market and want to give it to a small child, an adult with an impaired immune system, or make cheese out of it.
  2. There could be a zombie apocalypse and all things homesteading will be increasingly important. :)
  3. The world banking system could fail, leading to a return to feudalism. :)

In the case of 2 or 3 above, there probably won’t be interwebs anymore, so I suggest studying well. You never know when you might need the information.

How To Pasteurize Milk at Home

In the simplest terms, raw milk can be made extremely safe to drink by bringing it to 161° F for 30 seconds, or bringing it to 140° F for 30 minutes. I use the “high and fast” method for drinking and general use and the “slow and low” for making cheese. (Higher temperatures can effect the quality of cheese, but the quicker time makes it more convenient for general use.)

Step 1: In a clean and sterilized, non-reactive pot or double boiler, bring the milk up to temperature. Stir the milk on occasion with a sterilized spoon or spatula so that the bottom doesn’t scorch. Note: In the picture below, I am pasteurizing 5 quarts of milk. I am not using a double boiler since it wouldn’t fit. I have once pasteurized as little as 1 quart (rushing to work in the morning and needing milk for coffee and cereal) and I used the double boiler. It took less time to pasteurize a quart of milk than it took to make 2 cups of coffee.

20120830-202708.jpg

Step 2: While the milk is heating, clean and sterilize the bottles. I wash them in hot water and then add a teaspoon of bleach. I fill them with hot water up to the brim, seal them with their lids and let them sit for 2 minutes. Rinse very well.

Step 3: Prepare your set up for cooling the milk. The taste will be best if you can cool the milk as quickly as possible once it has been at 161° F for 30 seconds or 140° F for 30 minutes. Water is a better conductor of heat than air, so the bottles will cool fastest in a bath of ice water. For a batch this large, I put a stopper in the smaller, second half of my sink and fill it with ice, ice packs and water.

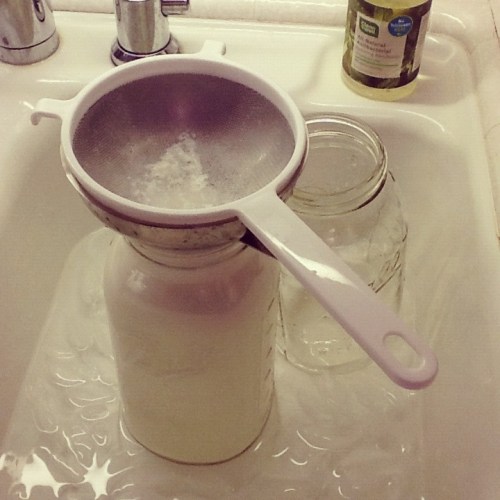
Step 4: As soon as the milk has hit 161° F for 30 seconds or 140° F for 30 minutes, pour it into clean and sterilized bottles through a filter. I also use a large funnel. A mesh filter will catch any bits of milk that have “cooked.” (Tip: if the surface of your sink is uneven, place a small plate upside down and then place the bottles on top of the plate.)

20120830-202720.jpg

Step 5: Seal the bottles. Submerge them in ice water. Let the bottles cool until they are at least room temperature, then dry them and move them to the refrigerator.

20120830-202730.jpg

Voila! Pasteurized milk is supposed to last longer in the fridge than raw.

(Pictures of the goats are courtesy White Mountains Ranch.)

UPDATE: Please check out our brand new Store for all of the equipment and supplies used in pasteurizing milk and cheese making.

Raw milk can be a hot topic, so some thoughts regarding comments: Opinions and information regarding raw milk are okay but please be kind. These are the choices we have made for our family after research and deliberation. Please respect our self determination as well as those of other commenters. My intention is not tell you TO drink milk a certain way, only HOW if you so choose. Thank you!

How To Boil the Perfect Fresh Egg

On our little backyard homestead, summer brings not only a bounty of vegetables and herbs, but also a plethora of eggs. Chickens respond to the longer days and increased light and are at their peak of production. This is one reason why commercial egg producers will keep lights on the hens, day and night. We live in San Diego and have never felt the need to add artificial light, but if you live more to the north, it might be something to consider for a few hours a day during the winter months.

This year I have been having fun swapping or trading extra eggs with other local urban homesteaders. In exchange for eggs and some dairy products, we have received homemade jams, fresh salad, kombucha, lemons and lemon curd, AVOCADOS (our absolute fav), home-baked bread, homemade granola, fresh bay leaves, chicken broth and more.

But one of my favorite ways to enjoy extra eggs is to hard boil a batch. Hardboiled egg yolk has also been a staple in baby’s diet, especially during months 6-10. Plenty of people use the following technique, but it was my grandmother who showed me how.

Boiling the Perfect Egg

Step 1: If using fresh eggs, wash them.

Step 2: Place the eggs in a medium-sized pot. Try to have enough eggs so that they are somewhat cozy, without too much room, and only in one layer.

20120820-185248.jpg

Step 3: Cover the eggs in cold water.

Step 4: Put the pot on high heat and bring to a boil.

Step 5: As soon as the water boils, take it off the heat, cover with a lid and set a timer for 12 minutes.

20120820-185302.jpg

Step 6: Have a bowl ready with cold water and ice. As soon as 12 minutes are up, pour out the hot water, rinse once with cold tap water and then transfer to the ice bath. If you leave them in the pot to cool, the water will quickly heat up again from the residual heat in the pot and continue cooking the eggs.

Ways to Enjoy the Eggs:

For baby the yummiest combo is half a hardboiled yolk, mashed avocado and breastmilk. My baby is “so over” purées at 11 months but will make an exception for this silky, creamy concoction. No special equipment needed other than a fork for mashing, making this a great combo to take on the road.

20120820-185312.jpg

Hardboiled eggs make a great quick snack. Just like the raw energy bites, I love having instant food on hand. Oftentimes, when I am making baby something with the yolk, I just pop the white of the egg in my mouth. :)

My go-to summer lunch includes a green salad topped with sliced hardboiled eggs, an artisan balsamic vinegar and olive oil and fresh veggies. You can use any dressing you like, but try a really good balsamic and oil. There is something magical about the way the bits of yolk mix with the vinegar. Perhaps it is emulsifying a little in the mouth?

20120820-185322.jpg

This salad has spring mix, avocado, hardboiled egg, tomatoes from my garden, snap peas from my mom’s garden, an espresso balsamic, blood orange olive oil and a little truffled goat cheese. The oil and vinegar are from a local shop.

Notes:

Occasionally fresh eggs will be hard to peel. One tip is to reserve the oldest eggs in your fridge for boiling. Papa Bird shares that thin shells can be a symptom of a calcium deficiency in the chickens. A simple remedy is to feed the hens shells that you have rinsed and crushed up. Since he has been doing that our eggs peel easily now.

Egg yolk can be constipating for babies. At one point we had to cut back from eggs daily to every other day.

And finally: Papa Bird’s tip on how to tell if an egg is raw or hardboiled. Try to spin it like a top… if it spins, it’s cooked. If it wobbles and can’t get a decent spin, it is raw.

A Reader Asks: What To Do With All the Tomatoes?

A friend and reader on our new Facebook page asked about what to do with ALL the tomatoes her garden was producing. You can certainly freeze tomatoes, make salsa, eat salads and oven dry them. But when time is of the essence, and you happen to be hungry, nothing is better than a quick tomato sauce.

The heat has been strong for San Diego and many of our tomatoes have been splitting. This evening Papa Bird strapped baby on with his favorite carrier (an Ocah mei tai Didymos Indio wrap conversion, for those that are into Babywearing) and picked at least a dozen tomatoes. I was busy pasteurizing milk, switching out the kefir and starting cheese. I had spinach and ricotta ravioli that my sister gave me when she cleaned out her freezer before moving to Portland. That plus this recipe was about all I had time for.

20120822-210409.jpg

Quick Tomato Sauce Recipe

  • 1/2 large sweet onion
  • 1 carrot
  • 2 cloves of garlic, crushed
  • salt and pepper
  • 4-5 large tomatoes, roughly chopped
  • splash of red wine (optional)
  • fresh herbs, such as basil

Saute the onion and carrot in a pan with olive oil and salt and pepper. When soft, add the garlic, then the tomatoes. Let them cook down a little. If you add wine, make sure the alcohol cooks out totally. Simmer for about 10 minutes. If it’s soupy, don’t cover. If it’s on the dry side, keep covered.

20120822-210509.jpg

I love how the center of this tomato looks!

Never Go Hungry Frittata: Backyard Chickens Save the Day

It has been a little over two years since our family grew to include an average of five chickens. Having hens means there is always something to make for dinner. I can’t tell you how many times I’ve thought there was nothing to eat in the house and was able to pull something delicious together thanks to our eggs. Backyard chickens really do save the day–or at least dinner.

Occasionally I will have dough for a single pie crust (either homemade or store bought) in the freezer and will make a quiche, but I most often make a frittata or tortilla española. Both of those are simply different names (Italian and Spanish, respectively) for the same thing, which is essentially a crust-less quiche. Without the crust it is a little healthier and definitely faster, easier and potentially more affordable (especially if you buy the crust or crust dough.) We also do a lot of scrambles, but a frittata or tortilla just seem a little more “dinner.”

Between baby and work I don’t always make it to the grocery store before the fridge starts looking empty. This week was no exception so I picked a few veggies and herbs from the garden and collected a few more eggs. Zucchini goes particularly well with eggs. :)

 I also found a few potatoes and snap peas in the fridge. I don’t have a picture of the frittata fully completed since a little Baby bird started getting cranky, but here it is nearly done:

20120816-172112.jpg

Never-Go-Hungry Frittata Recipe

This is more of a template than a recipe. Feel free to improvise with the ingredients and make it your own!

Step 1: Pre-cook hard vegetables like potatoes or broccoli (boil, roast, etc.) Please also clean out your fridge of any already cooked leftovers. Oven roasted veggies are awesome, as is any leftover meat. This is a great use of a little meat that would be less than a full serving if eaten alone. (My husband finds it more substantial when I use potatoes.)

Step 2: Sauté aromatics, like onion, in a healthy amount of olive oil or coconut oil (it will also be keeping the egg from sticking) on medium heat. Season with salt and pepper. Add other veggies and cook until soft. (Options are endless, but try zucchini, mushrooms, garlic, bell pepper, kale and other greens…)

Step 3: Beat eggs with a fork vigorously until light and fluffy. Use at least 2-3 eggs per serving. You want to have enough eggs to cover all the filling that is in the pan. If you need to use more eggs than you will eat that night, do it. Leftover frittata is great. If you run out of eggs and need a little more volume, add in a little milk. Season with salt, pepper and spices and then pour into the pan. Turn the heat down to low.

Step 4: Finish by adding fresh herbs, tomatoes and cheese. (All I had was my truffled goat cheese. Cooking it essentially wasted the truffle salt. Adding any kind of heat takes away the flavor of truffles which is why they should be used only as a finisher. But, hey, I needed the cheese!)

Step 5: There are at least three options for cooking it all the way through:

  1. Cover the pan with a lid and cook on super low heat until the top appears set.
  2. If you have an oven proof pan (i.e. the handle is entirely metal and not covered in rubber) you can transfer it to the oven and broil a few minutes to cook the top.
  3. If you are daring, try the Spanish method. Once the bottom half of the tortilla is cooked, take a large plate and flip the entire tortilla onto the plate and then slide it into the pan so that the other side is now down. Finish cooking until the center is done. (This is heavy and awkward for me personally, so I use one of the first two methods.)

Serve cut into wedges. Goes great with a green salad.

Notes:

If your zucchini grow a little too big, like ours often do, I recommend peeling them and cutting out the seeds at the core. The rest of the flesh will still be good.

Want to know a trick for fluffy eggs I learned in Spain? When I was an exchange student I watched the señora I lived with make tortillas like this: she tipped a bowl so that all the yolks drifted to one side. Then she beat the side with the whites with a fork vigorously until they were completely broken up. Next she incorporated one yolk at a time. Essentially, she beat the whites alone without going to the trouble of officially separating the eggs. I’ve done the same ever since.

Tips for cooking for baby:

Pediatricians recommend avoiding egg whites until baby is one year old. We have given her plenty of egg yolk since around 7 months but we still do not feed her whole eggs. I often reserve the filling just before pouring the eggs in. Potatoes, zucchini and other sauteed veggies make great homemade baby food! In our case this week I wasn’t fast enough. She was getting super tired and the only thing done was the boiled potatoes.  Lucky for her she likes baby mashed potatoes….

And here it is:

Baby’s First Mashed Potatoes Recipe

Scrub organic potatoes until clean.  Potatoes are a priority to buy (or grow) organic, even if you don’t normally do, since they are sponges for pesticides. Roughly chop and boil in water until they are fork tender. Drain and let cool. Pull off the skin. Mash them in a baby food mill, with a potato ricer, or with a fork. Add a good helping of breast milk until they are smooth and creamy.

Cauliflower is also yummy mashed, either alone or mixed with potatoes.